

If you use Discord, you’ve probably seen a lot of bots on popular servers. There is a bot for nearly everything, whether it is a music bot or a server moderation bot. If you want to develop your own Discord bot in 2022 and beyond, read our article on how to create a Discord bot.
Discord is a popular real-time messaging application that offers extensive bot support. On Discord are commonplace, and they offer a variety of services like moderation, games, music, internet searches, money processing, and more.
Introduction
If you haven’t used Discord before, it’s likely that this is your first online experience. Greetings, pal! It’s a lovely spot. Discord is a chat network that was originally made for gaming groups. It has great voice and video streaming features.
It has a lot of flexibility, including bots, custom moderating tools, and more, which we’ll go over here. In this article, we’ll show you how to create a completely customized Discord bot that can be installed on your server in about 10 minutes.
We’ll use Autocode, which will provide you with free hosting, manage your Discord login automatically, and set up webhooks for you. This will free you up to concentrate on the fun part: creating a fantastic bot for your server!
Create your own Discord bot (2022)
Requirements for Creating a Discord Bot: For this article, we were going to utilise the famous Discord.py Python bot. However, in light of the library’s future, we’ve chosen to use the discord.js Node library instead. As a result, make sure Node.js is installed on your machine. The current version of Node.js may be downloaded from the official website (visit).
To ensure that Node.js and npm are correctly installed on your PC, follow the following instructions. Use any of these top text editors for coding to easily read, write, and alter code. If we had to choose, we’d choose Microsoft’s Visual Studio Code (download), which also comes with a number of VSCode styles.

Create and Configure your Discord Bot
The next step is to go to the Discord Developer Portal and create a Discord bot within a Discord application. Alternatively, you may put the following URL into your browser’s address field:
https://discord.com/developers/applications
- Once you’ve entered the developer console, At the top-left, select New Application.
- In the supplied field, give your application a name.
- After that, click “Create.”
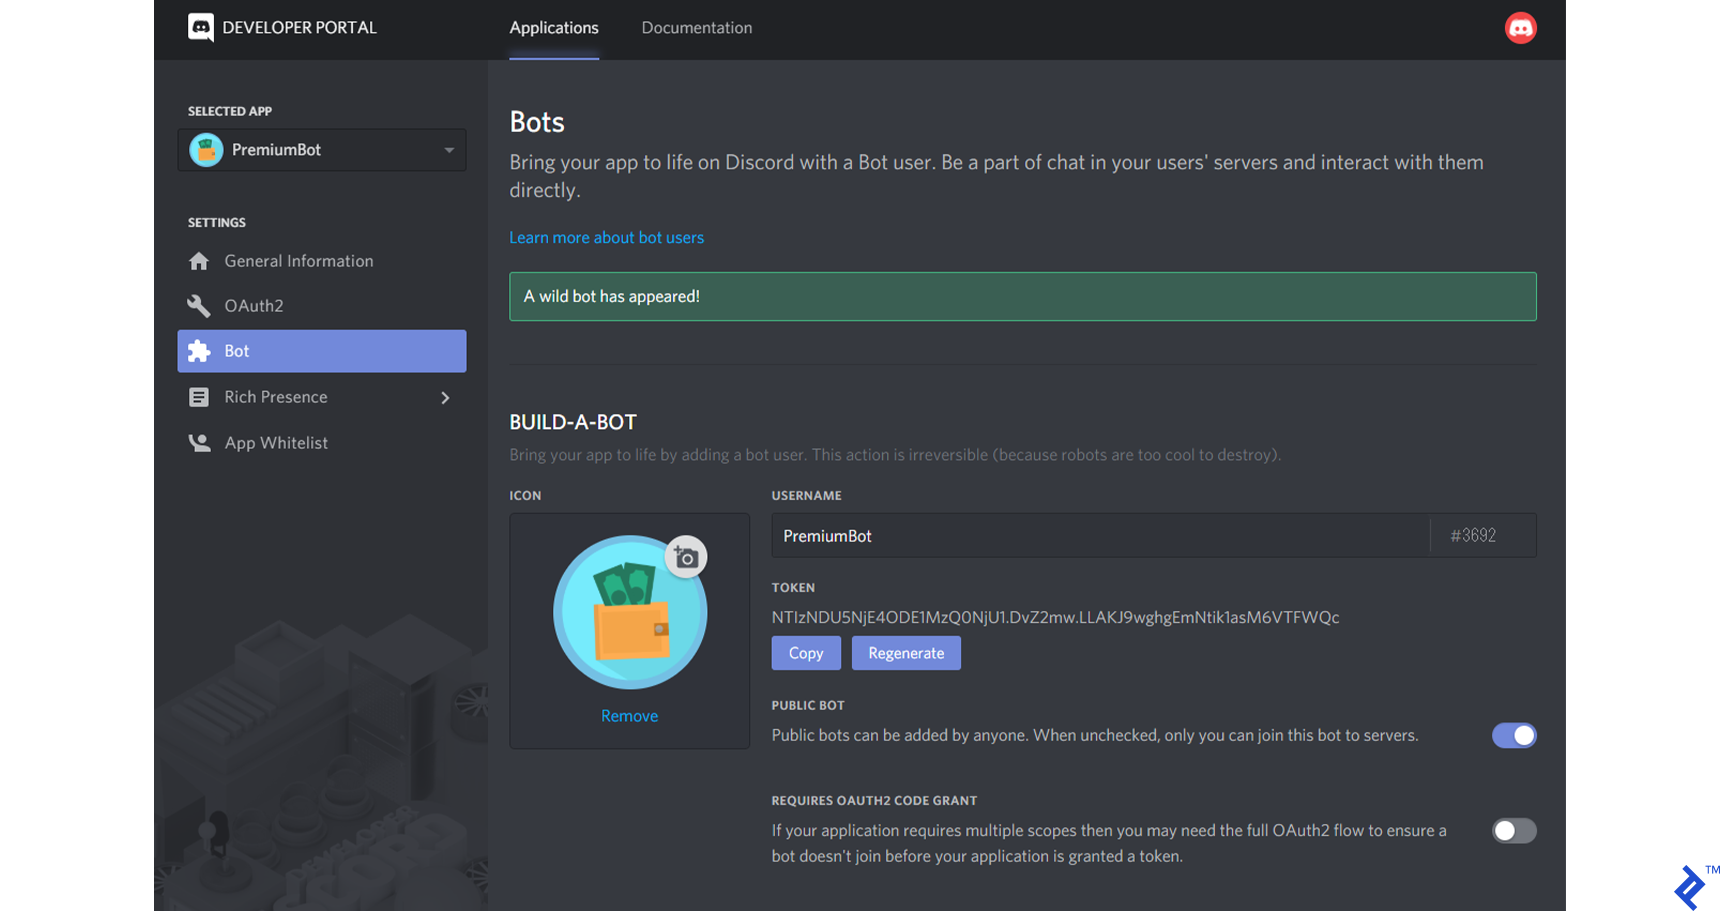
- Select Bot from the left-hand sidebar. At the far right, click Add Bot.
- Choose “Yes”, do it! from the following prompt:
- To copy your bot token, click Copy.
- Create a text file and paste it into your project’s root directory.
- You can call the file secret.txt whatever you like.
- Make sure the duplicated token isn’t shown.
- Scroll down and turn on the PRESENCE INTENT switch. Also, turn on the SERVER MEMBERS INTENT toggle.
- Then, on the left bar, choose OAuth2 to add authentication priority to your Discord bot.
- Choose URL Generator to make a bot invitation URL for the server you built before.
- Select one from the choices under SCOPES.
- Select roles for your Discord bot by scrolling down to the BOT PERMISSION section.

We’ll give it the Administrator job in this situation. To copy the generated URL to your clipboard, scroll to the bottom and click COPY.
Create and host a Discord Bot on your PC
It’s time to setup the bot now that you’ve added it to your Discord server. To locally host a Discord bot on your PC, simply follow the steps below:
Create a new folder on your computer. Then, in this folder, create two files:.env and bot.js. Paste the bot’s token you copied previously in the.env file in the following format:
- Next, in your bot.js file, add the following code.
- When a user delivers the word “ping,” the bot will respond with “pong.”
- Run the following command to install the Discord.js library:
- The next step is to create a package. “npm init -y” will create a json file.
- Finally, you may start your Discord bot using the command “node bot.js.”
- As you can see in the screenshot below, the bot works as expected and responded to my test message.
Connect Your Discord Bot to a Server
A bot, as previously said, mostly functions within the server. As a result, after you’ve created a Discord bot like we did, you’ll need to attach it to a server.
To link your chat room to the Discord bot, copy the created URL and follow the instructions below:
- Copy the URL and paste it into the address area of your browser.
- Select a server from the prompt and select the one you built previously.
- To continue, click Continue.
- A new menu will appear, containing a list of rights you have previously established.
Choose to Authorize
To finish approving your Discord bot, solve the CAPTCHA. You’ve successfully built a Discord bot. Return to your server dashboard and look at the right sidebar for the robot. However, as you can see, it is presently unavailable. As a result, it won’t operate unless you programme it to. You’ll need to develop a script in any programming language you like to make your bot operate.
Final Thoughts
Discord is no longer the new kid on the block; it is now one of the world’s largest real-time communication systems. Most Discord bots are made by small-time hobbyists, but if the number of people who use the service grows, there may be business opportunities.
Some businesses, such as Patreon, have already entered the fray. In this post, we got a high-level review of Discord’s user interface, a high-level overview of its APIs, a thorough education in Discord bot development, and a first-hand account of what it’s like to run a bot at corporate size. I hope you’ll be intrigued by the technology and feel confident in your understanding of how it works.