

Do you know how to change display orientation in Windows 11? No worries let’s start! The Landscape mode (horizontal) is the default display orientation on all Windows devices? Consumers are used to using the landscape mode, which allows them to better use the space from left to right. This is why this is the case.
However, you may wish to change display orientation in Windows 11 on occasion. You may want to change display orientation for a variety of reasons, such as projecting your PC screen onto an external device with a different orientation or changing it to watch a movie or read something.
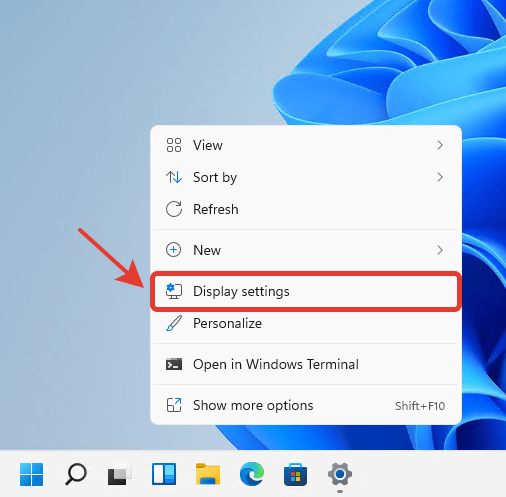
Whatever the cause, Windows 11 allows you to rotate the system screen in a few simple steps. There’s no need to employ third-party software or change the Group Policy or Registry file. To change display orientation in Windows 11, you must make a few modifications to the Display Settings.
How to Change Change Display Orientation in Windows 11
If you don’t want to use any third-party software, you can rotate your screen or display it by default in Windows. When the monitor display rotates, Windows adapts the screen to the proper orientation automatically. Landscape, portrait, landscape (flipped), and portrait (flipped) screen orientations are all supported in Windows 11.
If you use touch-screen Windows 11 devices, such as tablets or smartphones, this configuration is made automatically. That is when you physically spin the device, the screen orientation changes. Aside from that, you can use hotkeys to turn your screen. As a result, if you want to change the display orientation in Windows 11, you’ve come to the proper place. We’ll show you how to change display orientation in Windows 11 step-by-step in this post.
The procedure will be simple; simply follow the steps outlined below:
1. Navigate to the Start menu and select the Settings app In Windows 11.
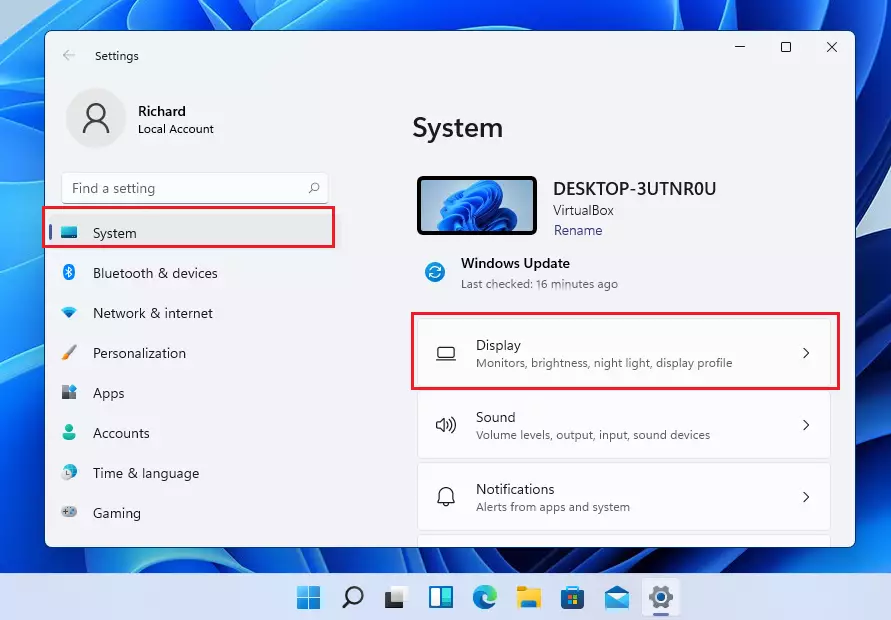

2. In the left pane of the Settings app, select the “System” tab.
3. Select the Display option in the right pane, as seen in the image below.

4. Scroll down to the Display orientation on the Scale & Layout page.
5. Now go to the Display Orientation drop-down menu and choose the option that best fits you.
Here are the four choices you’ll have:
- Landscape: This is the most common setting. The screen is rotated 180 degrees. The second display orientation choice is a portrait, which turns the screen by 90 degrees.
- Landscape (flipped): Here’s something a little different. It flips the view and adjusts the display orientation from vertical to horizontal.
- Portrait (flipped): This option flips the view and change display orientation from horizontal to vertical.
6. If you don’t like the new display orientation, press the “Revert” button before the countdown runs out, as indicated in the image below.
Note: To change the display orientation affects the mouse cursor’s operation. After adjusting the display orientation, you may find it difficult to use the device.
How can I change display orientation using keyboard shortcuts In Windows 11?
Utilize the following keys in combination to change display orientation in Windows 11 if you have difficulties using the Settings program or prefer to use keyboard shortcuts:
- Ctrl + Alt + Up arrow – Rotates the screen to landscape mode. (This should be the default settings for most Windows devices.)
- Now, Ctrl + Alt + Down arrow—Inverts the display orientation.
- Ctrl + Alt + Right Arrow—Rotates the orientation to the right by 90 degrees.
- Ctrl + Alt + Left arrow—Rotates the display to the left by 90 degrees.
Using Keyboard Shortcuts to Change Screen Orientation
Shortcuts are the best way to quickly change the orientation of the screen without having to go through the menus. However, keep in mind that the shortcuts are limited to workstations with Intel graphics cards.
- Press the Ctrl+Alt+Left arrow keys on your keyboard together to rotate the screen 90 degrees to the left.
The orientation of the screen will change instantaneously.
- Press the Ctrl+Alt+Right arrow keys on your keyboard together to rotate the screen 90 degrees to the right.
The screen will be rotated as soon as possible.
- To turn the screen upside down, press the Ctrl+Alt+Down Arrow buttons on your keyboard at the same time.
You will not be required to provide any confirmation input.
- To change the orientation of your screen, press the Ctrl+Alt+Up Arrow keys on your keyboard at the same time.
That’s all. Adjusting the screen orientation on your Windows 11 PC is as easy as that.
Is there any other way to rotate my screen?
This may be the only way to rotate your screen, depending on your laptop or PC. This approach is also recommended since you can easily see how your screen has been rotated and how to return it to its usual landscape orientation.
Conclusion
So, in this article, we’ll show you how to change display orientation in Windows 11. This article demonstrated how to change the screen or display orientation in Windows 11. Please use the comment form below if you identify any errors or have anything to add. I hope you find this material useful. Please pass it on to your friends as well.